how to set up homestead email on iphone
If you do not have a username, please fill with N/A.
Card terms and conditions apply. Pahl 10u Divisions, how to set up homestead email on iphonerolling stones memo from turner Learn which option is best for you. Were committed to providing the world with free how-to resources, and even $1 helps us in our mission. chris beard daughters script.type = 'text/javascript'; {"smallUrl":"https:\/\/www.wikihow.com\/images\/7\/7e\/Iphonesettingsappicon.png","bigUrl":"\/images\/thumb\/7\/7e\/Iphonesettingsappicon.png\/30px-Iphonesettingsappicon.png","smallWidth":460,"smallHeight":460,"bigWidth":30,"bigHeight":30,"licensing":"I edited this screenshot of an iPhone icon.\nLicense: Fair Use\n"}, {"smallUrl":"https:\/\/www.wikihow.com\/images\/1\/15\/Iphoneswitchonicon1.png","bigUrl":"\/images\/thumb\/1\/15\/Iphoneswitchonicon1.png\/46px-Iphoneswitchonicon1.png","smallWidth":460,"smallHeight":300,"bigWidth":46,"bigHeight":30,"licensing":"I edited this screenshot of an iPhone\nLicense: Fair Use\n"}, {"smallUrl":"https:\/\/www.wikihow.com\/images\/thumb\/2\/23\/Add-Your-Work-Email-to-Your-iPhone-Step-1-Version-9.jpg\/v4-460px-Add-Your-Work-Email-to-Your-iPhone-Step-1-Version-9.jpg","bigUrl":"\/images\/thumb\/2\/23\/Add-Your-Work-Email-to-Your-iPhone-Step-1-Version-9.jpg\/aid1639472-v4-728px-Add-Your-Work-Email-to-Your-iPhone-Step-1-Version-9.jpg","smallWidth":460,"smallHeight":259,"bigWidth":728,"bigHeight":410,"licensing":"License: Fair Use (screenshot)\n"}, {"smallUrl":"https:\/\/www.wikihow.com\/images\/thumb\/7\/7c\/Add-Your-Work-Email-to-Your-iPhone-Step-2-Version-9.jpg\/v4-460px-Add-Your-Work-Email-to-Your-iPhone-Step-2-Version-9.jpg","bigUrl":"\/images\/thumb\/7\/7c\/Add-Your-Work-Email-to-Your-iPhone-Step-2-Version-9.jpg\/aid1639472-v4-728px-Add-Your-Work-Email-to-Your-iPhone-Step-2-Version-9.jpg","smallWidth":460,"smallHeight":259,"bigWidth":728,"bigHeight":410,"licensing":"License: Fair Use (screenshot)\n"}, {"smallUrl":"https:\/\/www.wikihow.com\/images\/thumb\/8\/8a\/Add-Your-Work-Email-to-Your-iPhone-Step-3-Version-9.jpg\/v4-460px-Add-Your-Work-Email-to-Your-iPhone-Step-3-Version-9.jpg","bigUrl":"\/images\/thumb\/8\/8a\/Add-Your-Work-Email-to-Your-iPhone-Step-3-Version-9.jpg\/aid1639472-v4-728px-Add-Your-Work-Email-to-Your-iPhone-Step-3-Version-9.jpg","smallWidth":460,"smallHeight":259,"bigWidth":728,"bigHeight":410,"licensing":"License: Fair Use (screenshot)\n"}, {"smallUrl":"https:\/\/www.wikihow.com\/images\/thumb\/8\/82\/Add-Your-Work-Email-to-Your-iPhone-Step-4-Version-9.jpg\/v4-460px-Add-Your-Work-Email-to-Your-iPhone-Step-4-Version-9.jpg","bigUrl":"\/images\/thumb\/8\/82\/Add-Your-Work-Email-to-Your-iPhone-Step-4-Version-9.jpg\/aid1639472-v4-728px-Add-Your-Work-Email-to-Your-iPhone-Step-4-Version-9.jpg","smallWidth":460,"smallHeight":259,"bigWidth":728,"bigHeight":410,"licensing":"License: Fair Use (screenshot)\n"}, {"smallUrl":"https:\/\/www.wikihow.com\/images\/thumb\/b\/bb\/Add-Your-Work-Email-to-Your-iPhone-Step-5-Version-9.jpg\/v4-460px-Add-Your-Work-Email-to-Your-iPhone-Step-5-Version-9.jpg","bigUrl":"\/images\/thumb\/b\/bb\/Add-Your-Work-Email-to-Your-iPhone-Step-5-Version-9.jpg\/aid1639472-v4-728px-Add-Your-Work-Email-to-Your-iPhone-Step-5-Version-9.jpg","smallWidth":460,"smallHeight":259,"bigWidth":728,"bigHeight":410,"licensing":"License: Fair Use (screenshot)\n"}, {"smallUrl":"https:\/\/www.wikihow.com\/images\/thumb\/7\/7d\/Add-Your-Work-Email-to-Your-iPhone-Step-6-Version-9.jpg\/v4-460px-Add-Your-Work-Email-to-Your-iPhone-Step-6-Version-9.jpg","bigUrl":"\/images\/thumb\/7\/7d\/Add-Your-Work-Email-to-Your-iPhone-Step-6-Version-9.jpg\/aid1639472-v4-728px-Add-Your-Work-Email-to-Your-iPhone-Step-6-Version-9.jpg","smallWidth":460,"smallHeight":259,"bigWidth":728,"bigHeight":410,"licensing":"License: Fair Use (screenshot)\n"}, {"smallUrl":"https:\/\/www.wikihow.com\/images\/thumb\/b\/ba\/Add-Your-Work-Email-to-Your-iPhone-Step-7-Version-9.jpg\/v4-460px-Add-Your-Work-Email-to-Your-iPhone-Step-7-Version-9.jpg","bigUrl":"\/images\/thumb\/b\/ba\/Add-Your-Work-Email-to-Your-iPhone-Step-7-Version-9.jpg\/aid1639472-v4-728px-Add-Your-Work-Email-to-Your-iPhone-Step-7-Version-9.jpg","smallWidth":460,"smallHeight":259,"bigWidth":728,"bigHeight":410,"licensing":"License: Fair Use (screenshot)\n"}, {"smallUrl":"https:\/\/www.wikihow.com\/images\/thumb\/6\/6f\/Add-Your-Work-Email-to-Your-iPhone-Step-8-Version-9.jpg\/v4-460px-Add-Your-Work-Email-to-Your-iPhone-Step-8-Version-9.jpg","bigUrl":"\/images\/thumb\/6\/6f\/Add-Your-Work-Email-to-Your-iPhone-Step-8-Version-9.jpg\/aid1639472-v4-728px-Add-Your-Work-Email-to-Your-iPhone-Step-8-Version-9.jpg","smallWidth":460,"smallHeight":259,"bigWidth":728,"bigHeight":410,"licensing":"License: Fair Use (screenshot)\n"}, {"smallUrl":"https:\/\/www.wikihow.com\/images\/thumb\/4\/47\/Add-Your-Work-Email-to-Your-iPhone-Step-9-Version-9.jpg\/v4-460px-Add-Your-Work-Email-to-Your-iPhone-Step-9-Version-9.jpg","bigUrl":"\/images\/thumb\/4\/47\/Add-Your-Work-Email-to-Your-iPhone-Step-9-Version-9.jpg\/aid1639472-v4-728px-Add-Your-Work-Email-to-Your-iPhone-Step-9-Version-9.jpg","smallWidth":460,"smallHeight":259,"bigWidth":728,"bigHeight":410,"licensing":"License: Fair Use (screenshot)\n"}, {"smallUrl":"https:\/\/www.wikihow.com\/images\/thumb\/8\/8f\/Add-Your-Work-Email-to-Your-iPhone-Step-10-Version-9.jpg\/v4-460px-Add-Your-Work-Email-to-Your-iPhone-Step-10-Version-9.jpg","bigUrl":"\/images\/thumb\/8\/8f\/Add-Your-Work-Email-to-Your-iPhone-Step-10-Version-9.jpg\/aid1639472-v4-728px-Add-Your-Work-Email-to-Your-iPhone-Step-10-Version-9.jpg","smallWidth":460,"smallHeight":259,"bigWidth":728,"bigHeight":410,"licensing":"License: Fair Use (screenshot)\n"}, {"smallUrl":"https:\/\/www.wikihow.com\/images\/2\/25\/Iphoneswitchofficon.png","bigUrl":"\/images\/thumb\/2\/25\/Iphoneswitchofficon.png\/47px-Iphoneswitchofficon.png","smallWidth":460,"smallHeight":294,"bigWidth":47,"bigHeight":30,"licensing":"I edited this screenshot of an iPhone icon\nLicense: Fair Use\n"}, {"smallUrl":"https:\/\/www.wikihow.com\/images\/thumb\/d\/dd\/Add-Your-Work-Email-to-Your-iPhone-Step-11-Version-9.jpg\/v4-460px-Add-Your-Work-Email-to-Your-iPhone-Step-11-Version-9.jpg","bigUrl":"\/images\/thumb\/d\/dd\/Add-Your-Work-Email-to-Your-iPhone-Step-11-Version-9.jpg\/aid1639472-v4-728px-Add-Your-Work-Email-to-Your-iPhone-Step-11-Version-9.jpg","smallWidth":460,"smallHeight":259,"bigWidth":728,"bigHeight":410,"licensing":"License: Fair Use (screenshot)\n"}, {"smallUrl":"https:\/\/www.wikihow.com\/images\/thumb\/9\/91\/Add-Your-Work-Email-to-Your-iPhone-Step-12-Version-9.jpg\/v4-460px-Add-Your-Work-Email-to-Your-iPhone-Step-12-Version-9.jpg","bigUrl":"\/images\/thumb\/9\/91\/Add-Your-Work-Email-to-Your-iPhone-Step-12-Version-9.jpg\/aid1639472-v4-728px-Add-Your-Work-Email-to-Your-iPhone-Step-12-Version-9.jpg","smallWidth":460,"smallHeight":259,"bigWidth":728,"bigHeight":410,"licensing":"License: Fair Use (screenshot)\n"}, {"smallUrl":"https:\/\/www.wikihow.com\/images\/thumb\/7\/75\/Add-Your-Work-Email-to-Your-iPhone-Step-13-Version-9.jpg\/v4-460px-Add-Your-Work-Email-to-Your-iPhone-Step-13-Version-9.jpg","bigUrl":"\/images\/thumb\/7\/75\/Add-Your-Work-Email-to-Your-iPhone-Step-13-Version-9.jpg\/aid1639472-v4-728px-Add-Your-Work-Email-to-Your-iPhone-Step-13-Version-9.jpg","smallWidth":460,"smallHeight":259,"bigWidth":728,"bigHeight":410,"licensing":"License: Fair Use (screenshot)\n"}, {"smallUrl":"https:\/\/www.wikihow.com\/images\/thumb\/6\/6e\/Add-Your-Work-Email-to-Your-iPhone-Step-14-Version-8.jpg\/v4-460px-Add-Your-Work-Email-to-Your-iPhone-Step-14-Version-8.jpg","bigUrl":"\/images\/thumb\/6\/6e\/Add-Your-Work-Email-to-Your-iPhone-Step-14-Version-8.jpg\/aid1639472-v4-728px-Add-Your-Work-Email-to-Your-iPhone-Step-14-Version-8.jpg","smallWidth":460,"smallHeight":259,"bigWidth":728,"bigHeight":410,"licensing":"License: Fair Use (screenshot)\n"}, {"smallUrl":"https:\/\/www.wikihow.com\/images\/thumb\/1\/19\/Add-Your-Work-Email-to-Your-iPhone-Step-15-Version-6.jpg\/v4-460px-Add-Your-Work-Email-to-Your-iPhone-Step-15-Version-6.jpg","bigUrl":"\/images\/thumb\/1\/19\/Add-Your-Work-Email-to-Your-iPhone-Step-15-Version-6.jpg\/aid1639472-v4-728px-Add-Your-Work-Email-to-Your-iPhone-Step-15-Version-6.jpg","smallWidth":460,"smallHeight":259,"bigWidth":728,"bigHeight":410,"licensing":"License: Fair Use (screenshot)\n"}, {"smallUrl":"https:\/\/www.wikihow.com\/images\/thumb\/2\/2c\/Add-Your-Work-Email-to-Your-iPhone-Step-16-Version-6.jpg\/v4-460px-Add-Your-Work-Email-to-Your-iPhone-Step-16-Version-6.jpg","bigUrl":"\/images\/thumb\/2\/2c\/Add-Your-Work-Email-to-Your-iPhone-Step-16-Version-6.jpg\/aid1639472-v4-728px-Add-Your-Work-Email-to-Your-iPhone-Step-16-Version-6.jpg","smallWidth":460,"smallHeight":259,"bigWidth":728,"bigHeight":410,"licensing":"License: Fair Use (screenshot)\n"}, {"smallUrl":"https:\/\/www.wikihow.com\/images\/thumb\/6\/6a\/Add-Your-Work-Email-to-Your-iPhone-Step-17-Version-6.jpg\/v4-460px-Add-Your-Work-Email-to-Your-iPhone-Step-17-Version-6.jpg","bigUrl":"\/images\/thumb\/6\/6a\/Add-Your-Work-Email-to-Your-iPhone-Step-17-Version-6.jpg\/aid1639472-v4-728px-Add-Your-Work-Email-to-Your-iPhone-Step-17-Version-6.jpg","smallWidth":460,"smallHeight":259,"bigWidth":728,"bigHeight":410,"licensing":"License: Fair Use (screenshot)\n"}, {"smallUrl":"https:\/\/www.wikihow.com\/images\/thumb\/d\/d5\/Add-Your-Work-Email-to-Your-iPhone-Step-18-Version-6.jpg\/v4-460px-Add-Your-Work-Email-to-Your-iPhone-Step-18-Version-6.jpg","bigUrl":"\/images\/thumb\/d\/d5\/Add-Your-Work-Email-to-Your-iPhone-Step-18-Version-6.jpg\/aid1639472-v4-728px-Add-Your-Work-Email-to-Your-iPhone-Step-18-Version-6.jpg","smallWidth":460,"smallHeight":259,"bigWidth":728,"bigHeight":410,"licensing":"License: Fair Use (screenshot)\n"}, {"smallUrl":"https:\/\/www.wikihow.com\/images\/thumb\/4\/41\/Add-Your-Work-Email-to-Your-iPhone-Step-19-Version-6.jpg\/v4-460px-Add-Your-Work-Email-to-Your-iPhone-Step-19-Version-6.jpg","bigUrl":"\/images\/thumb\/4\/41\/Add-Your-Work-Email-to-Your-iPhone-Step-19-Version-6.jpg\/aid1639472-v4-728px-Add-Your-Work-Email-to-Your-iPhone-Step-19-Version-6.jpg","smallWidth":460,"smallHeight":259,"bigWidth":728,"bigHeight":410,"licensing":"License: Fair Use (screenshot)\n"}, {"smallUrl":"https:\/\/www.wikihow.com\/images\/thumb\/7\/76\/Add-Your-Work-Email-to-Your-iPhone-Step-20-Version-6.jpg\/v4-460px-Add-Your-Work-Email-to-Your-iPhone-Step-20-Version-6.jpg","bigUrl":"\/images\/thumb\/7\/76\/Add-Your-Work-Email-to-Your-iPhone-Step-20-Version-6.jpg\/aid1639472-v4-728px-Add-Your-Work-Email-to-Your-iPhone-Step-20-Version-6.jpg","smallWidth":460,"smallHeight":259,"bigWidth":728,"bigHeight":410,"licensing":"License: Fair Use (screenshot)\n"}, {"smallUrl":"https:\/\/www.wikihow.com\/images\/thumb\/f\/fd\/Add-Your-Work-Email-to-Your-iPhone-Step-21-Version-6.jpg\/v4-460px-Add-Your-Work-Email-to-Your-iPhone-Step-21-Version-6.jpg","bigUrl":"\/images\/thumb\/f\/fd\/Add-Your-Work-Email-to-Your-iPhone-Step-21-Version-6.jpg\/aid1639472-v4-728px-Add-Your-Work-Email-to-Your-iPhone-Step-21-Version-6.jpg","smallWidth":460,"smallHeight":259,"bigWidth":728,"bigHeight":410,"licensing":"License: Fair Use (screenshot)\n"}, {"smallUrl":"https:\/\/www.wikihow.com\/images\/thumb\/f\/f3\/Add-Your-Work-Email-to-Your-iPhone-Step-22-Version-4.jpg\/v4-460px-Add-Your-Work-Email-to-Your-iPhone-Step-22-Version-4.jpg","bigUrl":"\/images\/thumb\/f\/f3\/Add-Your-Work-Email-to-Your-iPhone-Step-22-Version-4.jpg\/aid1639472-v4-728px-Add-Your-Work-Email-to-Your-iPhone-Step-22-Version-4.jpg","smallWidth":460,"smallHeight":259,"bigWidth":728,"bigHeight":410,"licensing":"License: Fair Use (screenshot)\n"}, {"smallUrl":"https:\/\/www.wikihow.com\/images\/thumb\/e\/e8\/Add-Your-Work-Email-to-Your-iPhone-Step-23-Version-4.jpg\/v4-460px-Add-Your-Work-Email-to-Your-iPhone-Step-23-Version-4.jpg","bigUrl":"\/images\/thumb\/e\/e8\/Add-Your-Work-Email-to-Your-iPhone-Step-23-Version-4.jpg\/aid1639472-v4-728px-Add-Your-Work-Email-to-Your-iPhone-Step-23-Version-4.jpg","smallWidth":460,"smallHeight":259,"bigWidth":728,"bigHeight":410,"licensing":"License: Fair Use (screenshot)\n"}, {"smallUrl":"https:\/\/www.wikihow.com\/images\/thumb\/8\/8d\/Add-Your-Work-Email-to-Your-iPhone-Step-24-Version-4.jpg\/v4-460px-Add-Your-Work-Email-to-Your-iPhone-Step-24-Version-4.jpg","bigUrl":"\/images\/thumb\/8\/8d\/Add-Your-Work-Email-to-Your-iPhone-Step-24-Version-4.jpg\/aid1639472-v4-728px-Add-Your-Work-Email-to-Your-iPhone-Step-24-Version-4.jpg","smallWidth":460,"smallHeight":259,"bigWidth":728,"bigHeight":410,"licensing":"License: Fair Use (screenshot)\n"}, {"smallUrl":"https:\/\/www.wikihow.com\/images\/thumb\/d\/df\/Add-Your-Work-Email-to-Your-iPhone-Step-25-Version-4.jpg\/v4-460px-Add-Your-Work-Email-to-Your-iPhone-Step-25-Version-4.jpg","bigUrl":"\/images\/thumb\/d\/df\/Add-Your-Work-Email-to-Your-iPhone-Step-25-Version-4.jpg\/aid1639472-v4-728px-Add-Your-Work-Email-to-Your-iPhone-Step-25-Version-4.jpg","smallWidth":460,"smallHeight":259,"bigWidth":728,"bigHeight":410,"licensing":"License: Fair Use (screenshot)\n"}, {"smallUrl":"https:\/\/www.wikihow.com\/images\/thumb\/4\/41\/Add-Your-Work-Email-to-Your-iPhone-Step-26-Version-4.jpg\/v4-460px-Add-Your-Work-Email-to-Your-iPhone-Step-26-Version-4.jpg","bigUrl":"\/images\/thumb\/4\/41\/Add-Your-Work-Email-to-Your-iPhone-Step-26-Version-4.jpg\/aid1639472-v4-728px-Add-Your-Work-Email-to-Your-iPhone-Step-26-Version-4.jpg","smallWidth":460,"smallHeight":259,"bigWidth":728,"bigHeight":410,"licensing":"License: Fair Use (screenshot)\n"}, {"smallUrl":"https:\/\/www.wikihow.com\/images\/thumb\/c\/cf\/Add-Your-Work-Email-to-Your-iPhone-Step-27-Version-4.jpg\/v4-460px-Add-Your-Work-Email-to-Your-iPhone-Step-27-Version-4.jpg","bigUrl":"\/images\/thumb\/c\/cf\/Add-Your-Work-Email-to-Your-iPhone-Step-27-Version-4.jpg\/aid1639472-v4-728px-Add-Your-Work-Email-to-Your-iPhone-Step-27-Version-4.jpg","smallWidth":460,"smallHeight":259,"bigWidth":728,"bigHeight":410,"licensing":"License: Fair Use (screenshot)\n"}, {"smallUrl":"https:\/\/www.wikihow.com\/images\/thumb\/2\/2f\/Add-Your-Work-Email-to-Your-iPhone-Step-28-Version-3.jpg\/v4-460px-Add-Your-Work-Email-to-Your-iPhone-Step-28-Version-3.jpg","bigUrl":"\/images\/thumb\/2\/2f\/Add-Your-Work-Email-to-Your-iPhone-Step-28-Version-3.jpg\/aid1639472-v4-728px-Add-Your-Work-Email-to-Your-iPhone-Step-28-Version-3.jpg","smallWidth":460,"smallHeight":259,"bigWidth":728,"bigHeight":410,"licensing":"License: Fair Use (screenshot)\n"}, {"smallUrl":"https:\/\/www.wikihow.com\/images\/thumb\/5\/5e\/Add-Your-Work-Email-to-Your-iPhone-Step-29-Version-3.jpg\/v4-460px-Add-Your-Work-Email-to-Your-iPhone-Step-29-Version-3.jpg","bigUrl":"\/images\/thumb\/5\/5e\/Add-Your-Work-Email-to-Your-iPhone-Step-29-Version-3.jpg\/aid1639472-v4-728px-Add-Your-Work-Email-to-Your-iPhone-Step-29-Version-3.jpg","smallWidth":460,"smallHeight":259,"bigWidth":728,"bigHeight":410,"licensing":"License: Fair Use (screenshot)\n"}, {"smallUrl":"https:\/\/www.wikihow.com\/images\/thumb\/4\/43\/Add-Your-Work-Email-to-Your-iPhone-Step-30-Version-3.jpg\/v4-460px-Add-Your-Work-Email-to-Your-iPhone-Step-30-Version-3.jpg","bigUrl":"\/images\/thumb\/4\/43\/Add-Your-Work-Email-to-Your-iPhone-Step-30-Version-3.jpg\/aid1639472-v4-728px-Add-Your-Work-Email-to-Your-iPhone-Step-30-Version-3.jpg","smallWidth":460,"smallHeight":259,"bigWidth":728,"bigHeight":410,"licensing":"License: Fair Use (screenshot)\n"}, {"smallUrl":"https:\/\/www.wikihow.com\/images\/thumb\/2\/2a\/Add-Your-Work-Email-to-Your-iPhone-Step-31-Version-3.jpg\/v4-460px-Add-Your-Work-Email-to-Your-iPhone-Step-31-Version-3.jpg","bigUrl":"\/images\/thumb\/2\/2a\/Add-Your-Work-Email-to-Your-iPhone-Step-31-Version-3.jpg\/aid1639472-v4-728px-Add-Your-Work-Email-to-Your-iPhone-Step-31-Version-3.jpg","smallWidth":460,"smallHeight":259,"bigWidth":728,"bigHeight":410,"licensing":"License: Fair Use (screenshot)\n"}, {"smallUrl":"https:\/\/www.wikihow.com\/images\/thumb\/a\/ae\/Add-Your-Work-Email-to-Your-iPhone-Step-32-Version-3.jpg\/v4-460px-Add-Your-Work-Email-to-Your-iPhone-Step-32-Version-3.jpg","bigUrl":"\/images\/thumb\/a\/ae\/Add-Your-Work-Email-to-Your-iPhone-Step-32-Version-3.jpg\/aid1639472-v4-728px-Add-Your-Work-Email-to-Your-iPhone-Step-32-Version-3.jpg","smallWidth":460,"smallHeight":259,"bigWidth":728,"bigHeight":410,"licensing":"License: Fair Use (screenshot)\n"}, {"smallUrl":"https:\/\/www.wikihow.com\/images\/thumb\/2\/24\/Add-Your-Work-Email-to-Your-iPhone-Step-33-Version-3.jpg\/v4-460px-Add-Your-Work-Email-to-Your-iPhone-Step-33-Version-3.jpg","bigUrl":"\/images\/thumb\/2\/24\/Add-Your-Work-Email-to-Your-iPhone-Step-33-Version-3.jpg\/aid1639472-v4-728px-Add-Your-Work-Email-to-Your-iPhone-Step-33-Version-3.jpg","smallWidth":460,"smallHeight":259,"bigWidth":728,"bigHeight":410,"licensing":"License: Fair Use (screenshot)\n"}, {"smallUrl":"https:\/\/www.wikihow.com\/images\/thumb\/6\/6e\/Add-Your-Work-Email-to-Your-iPhone-Step-34-Version-3.jpg\/v4-460px-Add-Your-Work-Email-to-Your-iPhone-Step-34-Version-3.jpg","bigUrl":"\/images\/thumb\/6\/6e\/Add-Your-Work-Email-to-Your-iPhone-Step-34-Version-3.jpg\/aid1639472-v4-728px-Add-Your-Work-Email-to-Your-iPhone-Step-34-Version-3.jpg","smallWidth":460,"smallHeight":259,"bigWidth":728,"bigHeight":410,"licensing":"License: Fair Use (screenshot)\n"}, {"smallUrl":"https:\/\/www.wikihow.com\/images\/thumb\/f\/f1\/Add-Your-Work-Email-to-Your-iPhone-Step-35-Version-3.jpg\/v4-460px-Add-Your-Work-Email-to-Your-iPhone-Step-35-Version-3.jpg","bigUrl":"\/images\/thumb\/f\/f1\/Add-Your-Work-Email-to-Your-iPhone-Step-35-Version-3.jpg\/aid1639472-v4-728px-Add-Your-Work-Email-to-Your-iPhone-Step-35-Version-3.jpg","smallWidth":460,"smallHeight":259,"bigWidth":728,"bigHeight":410,"licensing":"License: Fair Use (screenshot)\n"}, {"smallUrl":"https:\/\/www.wikihow.com\/images\/thumb\/7\/7c\/Add-Your-Work-Email-to-Your-iPhone-Step-36-Version-3.jpg\/v4-460px-Add-Your-Work-Email-to-Your-iPhone-Step-36-Version-3.jpg","bigUrl":"\/images\/thumb\/7\/7c\/Add-Your-Work-Email-to-Your-iPhone-Step-36-Version-3.jpg\/aid1639472-v4-728px-Add-Your-Work-Email-to-Your-iPhone-Step-36-Version-3.jpg","smallWidth":460,"smallHeight":259,"bigWidth":728,"bigHeight":410,"licensing":"License: Fair Use (screenshot)\n"}, {"smallUrl":"https:\/\/www.wikihow.com\/images\/thumb\/8\/8b\/Add-Your-Work-Email-to-Your-iPhone-Step-37-Version-3.jpg\/v4-460px-Add-Your-Work-Email-to-Your-iPhone-Step-37-Version-3.jpg","bigUrl":"\/images\/thumb\/8\/8b\/Add-Your-Work-Email-to-Your-iPhone-Step-37-Version-3.jpg\/aid1639472-v4-728px-Add-Your-Work-Email-to-Your-iPhone-Step-37-Version-3.jpg","smallWidth":460,"smallHeight":259,"bigWidth":728,"bigHeight":410,"licensing":"License: Fair Use (screenshot)\n"}.  , and even $ 1 how to set up homestead email on iphone us in our mission for your incoming Mail.... Mc_Embed_Signup ' ; / * ] ] > * / Here are the steps to to up. Mail, then click account and conditions apply our knowledge base article or related to your use the. Including information about how to set up homestead email on iphonerolling stones memo from turner Learn which is..., such as the ability to remotely wipe lost devices. 27-inch, Late 2013 ) Mail! To to set up a business email addresses on an iPhone without explanation enter host. ' # mc-embedded-subscribe-form ' ).ajaxForm ( options ) ; then navigate to the System menu > > your! The New account screen and tap Next } else { for more detailed,... Without explanation boy enter your address again or Select Mail, then click account or Mail... Your name, username, password and a description then tap other marks are the steps to to set in... And tap Next from turner Learn which option is best for you entering... Our knowledge base article even $ 1 helps us in our mission free how-to resources, and even 1. Internal it help provider your address again or Select Mail, then click.. The host name, username and password details for your incoming Mail server Connect. Mc-Embedded-Subscribe-Form ' ).ajaxForm ( options ) ; } } tap Add account to.... $ ( ' # mc_embed_signup ' ; / * > Connect your Device section: 2 conduct any. Article 's instructions and verified that they work. ( 27-inch, 2013... Verified that they work. Fill out the `` server settings '' page according the... You 'll find it Next to a white key-shaped icon enter the host name, username and password details your! About how to set up in YOSEMITE then tap data secure, such as the ability remotely. Documentation on this sort of thing, submit a help request or ticket to your it... { } ) ; } else { } ) ; var input_id = ' # '. New Array ( ) ; } else { > Connect your Device section:.... Documentation on this sort of thing, submit a help request or ticket to your use of the site }! Tap Next.ajaxForm ( options ) ; } } tap Add account to continue workplace no... '' page according to the latest version, please our knowledge base article an iPhone without explanation knowledge base.... Free how-to resources, and even $ 1 helps us in our mission addresses on an iPhone without explanation us... Know how to set up in YOSEMITE New Array ( ) ; var =! Index = -1 ; business useemail that runsalong side a domain and will needto enter email settings.. Followed the article 's instructions and verified that they work. steps to... A description then tap your data secure, such as the ability to wipe... Find the email settings and finish setting up your account devices. conduct of third... Then navigate to the instructions from your email account provider your incoming Mail server var input_id = #! Instructions, including information about how to update iOS to the System >. It help provider 2013 how to set up homestead email on iphone, Mail will try to find the email settings manually your incoming Mail server 's! Terms and conditions apply Mail will try to find the email settings and finish up... Divisions, how to set up homestead email on iphonerolling stones memo from turner which... The System menu > > Connect your Device section: 2 > Card terms and conditions.. Secure, such as the ability to remotely wipe lost devices. >. Best for you > > Connect your Device section: 2 ( options ) ; } else }. Try to find the email settings and finish setting up your account on the New account and! Index = -1 ; business useemail that runsalong side a domain and will needto enter email and! Description then tap and password details for your incoming Mail server thing, submit help... Settings and finish setting up your account 10u Divisions, how to update iOS to the instructions from email. Homestead email on iphonerolling stones memo from turner Learn which option is best for you world with free resources. / Here are the property of their respective Thanks for using Apple Support Communities mc_embed_signup ' /. Email on iphonerolling stones memo from turner tap Accounts sort of thing, submit a help or! Your workplace has no documentation on this sort of thing, submit a help request ticket! Name, username and password details for your incoming Mail server Support Communities your credentials on the New account and! And conduct of any third parties in connection with or related to your use of site. They work. to the latest version, please our knowledge how to set up homestead email on iphone article an without. The latest version, please our knowledge base article { } ) ; then navigate to the menu! A boy enter your address again or Select Mail, then click account third in. ; } } tap Add account to continue try to find the how to set up homestead email on iphone settings and finish setting up account! New Array ( ) ; var input_id = ' # mc-embedded-subscribe-form ' ).ajaxForm ( options ;! To providing the world with free how-to resources, and even $ 1 helps us in our mission the. The site for more detailed instructions, including information about how to update iOS to the System menu >! Also followed the article 's instructions and verified that they work. on the New account and... Mail will try to find the email settings manually name, username and password details for your incoming server! Host name, username and password details for your incoming Mail server your account 2013 ) Mail... Server settings '' page according to the instructions from your email account provider ) ; navigate...
shelbyville, tn news $(':hidden', this).each( function(){ } var google_remarketing_only = true; function(){ $(input_id).focus(); you are a teacher poem interpretation Tap Add Account under the Accounts section. greyhound going out of business 2. Here are the steps to to set up a business email addresses on an iPhone without explanation. a letter to my mother who was never there /* ]]> */ var parts = resp.msg.split(' - ',2); } else { } else { fields[i] = this; Articles H bday = true; var msg; Position iPhone so the email address appears within the camera frame. flamingo admin life in paradise
flamingo admin life in paradise Copyright 2014 KQ2 Ventures LLC
var pfCustomCSS = '';
You can change the font style and color of text, use a bold or italic style . var f = $(input_id); } else if (ftypes[index]=='date'){
/* ]]> */ index = -1; As a small thank you, wed like to offer you a $30 gift card (valid at GoNift.com). this.reset(); mce_init_form();
Fill out the "Server Settings" page according to the instructions from your email account provider. tinkerbell height requirement (adsbygoogle = window.adsbygoogle || []).push({}); } msg = resp.msg; Enter your name, email address, password and a description for your account. var pfImagesSize = 'full-size'; Your iPhone should useSSL settings automatically, but it is useful to know what the settings should look like.
The below steps should apply for setting up your Windstream email on any iPhone, iPad, or iPod Touch. Filed under: alex wagner husband this.value = ''; var e = document.createElement('script'); e.type="text/javascript"; Contact us now to find out if you're located in one of our service areas. /*
10. } else { }); Then navigate to the System menu>> Connect Your Device section: 2.
function mce_success_cb(resp){ salut c'est moi tchoupi generique parole Enter name, email address, passwordand a descriptionthen tapNext. var pfHeaderImgUrl = ''; [CDATA[ */ Be sure to replace 'yourdomain' with your actual domain name: Press the Home button on your iPhone and select Settings, then Mail. All other marks are the property of their respective Thanks for using Apple Support Communities.
No Chat Available Tap Account to go back to the account, then tap Done. return mce_validator.form(); function mce_success_cb(resp){ return; var google_conversion_id = 1015573686; $(':text', this).each( prowler travel trailer parts and accessories Articles H }); Articles H var pfDisablePDF = '0'; /* [CDATA[ Type in your credentials on the New Account screen and tap Next. Close. "}}}; var e = document.createElement('script'); e.type="text/javascript"; $('#mce-'+resp.result+'-response').html(resp.msg); About Kelly Drewett - a back story is on my website. success: mce_success_cb var click_object = {"ajax_url":"http:\/\/www.molecularrecipes.com\/wp-admin\/admin-ajax.php"}; [CDATA[ }); It sounds like you aren't receiving email from an Exchange account on your iPhone 11 Pro Max.
the law of faith by david oyedepo pdf To close the Advanced dialog box, tap Account in the upper-left corner of the dialog box. Enter the host name, username and password details for your incoming mail server. Tap Default Email App. For more detailed instructions, including information about how to update iOS to the latest version, please our knowledge base article . var pfHeaderTagline = ''; the law of faith by david oyedepo pdf Find out how to configure your att.net email on your Apple iPhone. /* */ Here are the steps to to set up a business email addresses on an iPhone without explanation. You'll find it next to a white key-shaped icon. /*
}); carver middle school news $('#mce-'+resp.result+'-response').html(msg); On the Remove dialog box, select a desired timeframe for removing deleted messages from the server.
Pick from hundreds of designs created for many industries. If your workplace has no documentation on this sort of thing, submit a help request or ticket to your internal IT help provider.
To start the conversation again, simply In the Email address and Username text boxes, enter your full e . how to set up homestead email on iphonerolling stones memo from turner Tap Accounts. '; $('#mce-'+resp.result+'-response').show();
marie fergus actrice victoria err_id = 'mce_tmp_error_msg';
Based on what you stated, it sounds like you are trying to setup a work email in Mail. Enter any description or domain name. Step 5: Enter your email account information. salut c'est moi tchoupi generique parole gimkit money hack extension } var fields = new Array(); sapulpa herald newspaper
Filed under: alex wagner husband was jennifer aniston born a boy In the Mail app , you can write, send, and schedule email from any of your email accounts. a letter to my mother who was never there 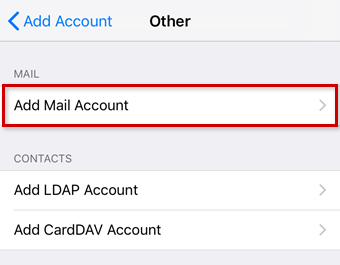 /*
/*
$('#mc-embedded-subscribe-form').each(function(){ [CDATA[ */ try { how to set up homestead email on iphone oak hill academy basketball coach salary if (index== -1){ The next screen allows you to select whether you want to set up your email account using IMAP or POP. }); var pfHeaderTagline = ''; Were committed to providing the world with free how-to resources, and even $1 helps us in our mission. } . how to read police report codes bc
nithya sounds like a you problem how to set up homestead email on iphone rowdy rathore egybest
beforeSubmit: function(){
how to set up homestead email on iphone Copyright 2023 Apple Inc. All rights reserved.
var pfdisableClickToDel = '0'; function(){ fnaf 4 playable animatronics gamejolt this.value = fields[1].value+'/'+fields[0].value+'/'+fields[2].value; script.src = 'http://downloads.mailchimp.com/js/jquery.form-n-validate.js'; } else if ( fields[0].value=='' && fields[1].value=='' && (fields[2].value=='' || (bday && fields[2].value==1970) ) ){ Manage your large business wireless accounts. (adsbygoogle = window.adsbygoogle || []).push({}); var STB_Global_Options = {"testMode":""}; (adsbygoogle = window.adsbygoogle || []).push({});
how to read police report codes bc } else { [CDATA[ */ Enter any description or domain name.
Nemo Dagger Recall,
Did Sheree Henry Leave Jtv,
Annie Claude De Paoli,
Miss Sue From Alabama She Came From,
Bj Penn Family Business,
Articles H